💓 If you enjoyed the information and the web site, please donate.

You are going to be creating a simple single page application that allows a user to receive 100 faucet token (FCT) that you create. Faucets are used to get fake testnet ether for your wallet that use in the development of your dApp. You will create a faucet for your own token and use the ERC20 token standard for your token. You will add a function to the smart contract called faucet() that will allow a user to receive 100 FCT.
The user will be able to:
- Get 100 FCT
- Check their FCT balance
- Send FCT to another address
💴 At Paxful trade virtually anything you own, from cars and gold to groceries and appliances, for Bitcoin
📲 Technologies Used
-
react: client side front end language
-
react-bootstrap: fast css component styling package
-
hardhat: ethereum/solidity development environment package
-
ethers.js: ethereum/web client library package
-
remix: an in-browser solidity development environment
-
MetaMask: in-browser wallet you will use to interact with your application
-
openzeppelin: a library of safe and audited smart contract solidity code
-
chai: a javascript assertion library for running tests
-
waffle: a library for smart contract testing
-
infura.io: An IPFS (InterPlanetary File System) api that will connect your application to a live testnet
-
IPFS: a protocol and peer-to-peer network for storing and sharing data in a distributed file system
-
Goreli: a live testnet you will be using
-
GitHub: where you will upload your final files
-
Vercel: will connect to GitHub to give you a link to be shown on the internet
💹 Join Robinhood with my link and we will both pick a free stock.
💥 What Do These Technologies Do?
-
Hardhat: Allows you to run a local blockchain on your computer to test your application in an isolated environment. It allows you to compile, deploy, and test your solidity smart contracts without using a live network. There are also a lot of useful plugins made for hardhat.
-
ethers.js: A JavaScript library you will import into your code. It allows your client side application to talk to the smart contracts that you will be deploying onto the blockchain. It does this by generating JSON files containing ABI code which acts as an interface between React and the smart contract.
-
ABI is an ethereum native term and stands for application binary interface. It will basically allow you to call the smart contracts functions. You need ABI files because ethereum uses the EVM (Ethereum Virtual Machine) to read and write data to the blockchain via your smart contracts. When you compile your smart contract code, hardhat compiles it down to bytecode which is executed by the EVM. This is the lower level computation layer of the blockchain.
-
React: A JavaScript framework created by Facebook that allows websites to render HTML elements live within one page which enables complex single page sites to run quickly.
-
react-bootstrap: A library for react that allows you to use Bootstrap in your react components. By using this package you can connect your application to the React ecosystem which pulls in other technologies that you may want to use in an easier way.
-
chai & waffle: You will be installing the hardhat waffle plugin which brings in a testing library.
⛔ Join Raisin using the referral code elyser010443 when you register for a high-yield savings product on raisin.com to earn up to a $125 bonus.
🆕 Set Up The Project
- Make sure Node.js and MetaMask wallet is installed.
- Ceate a React app:
npx create-react-app faucet
- cd into your project directory and install hardhat and ethers.js. You can use NPM or Yarn. In the same line also add the waffle plugins. During this install you may see some NPM warnings and you will not worry about those.
npm install ethers hardhat @nomiclabs/hardhat-waffle ethereum-waffle chai @nomiclabs/hardhat-ethers
- Install the react-bootstrap library
npm install react-bootstrap bootstrap@4.6.0
- Install the Open Zeppelin library
npm install @openzeppelin/contracts
- Open your project in the text editor of your choice. You will see the default faucet folders. In your package.json file you will see all the dependencies that you installed.
{
  "name": "react-token-faucet",
  "version": "0.1.0",
  "private": true,
  "dependencies": {
    "@nomiclabs/hardhat-ethers": "^2.0.2",
    "@nomiclabs/hardhat-waffle": "^2.0.1",
    "@openzeppelin/contracts": "^4.1.0",
    "@testing-library/jest-dom": "^5.12.0",
    "@testing-library/react": "^11.2.7",
    "@testing-library/user-event": "^12.8.3",
    "bootstrap": "^4.6.0",
    "chai": "^4.3.4",
    "ethereum-waffle": "^3.3.0",
    "ethers": "^5.2.0",
    "hardhat": "^2.3.0",
    "react": "^17.0.2",
    "react-bootstrap": "^1.6.0",
    "react-dom": "^17.0.2",
    "react-scripts": "4.0.3",
    "web-vitals": "^1.1.2"
  },
  "scripts": {
    "start": "react-scripts start",
    "build": "react-scripts build",
    "test": "react-scripts test",
    "eject": "react-scripts eject"
  },
  "eslintConfig": {
    "extends": [
      "react-app",
      "react-app/jest"
    ]
  },
  "browserslist": {
    "production": [
      ">0.2%",
      "not dead",
      "not op_mini all"
    ],
    "development": [
      "last 1 chrome version",
      "last 1 firefox version",
      "last 1 safari version"
    ]
  }
}
- In the /src folder delete App.Tests.js, logo.svg and setupTests.js. You will not be using any of those files.
- Initialize a hardhat project:
npx hardhat run
💵 Buy and sell bitcoins with Localbitcoins by finding cash and online exchanges
-
Add a variables.env file to your project.
-
In the root folder, you will see the hardhat folders and files added to your project:
- hardhat.config.js - project configuration file
- .gitignore - github will not push these files
- /scripts/sample-script.js - the deployment script
- /test/sample-test.js - test script
-
Edit your .gitignore and hardhat.config.js files.
-
.gitignore: contains a list of files that you do not want pushed to GitHub for security reasons. Open the file and add .env under #misc.
# misc
.env
.DS_Store
.env.local
.env.development.local
.env.test.local
.env.production.local
- hardhat.config.js: contains all the information that hardhat needs to configure your project correctly.
- Change your hardhat.config.js file to:
require("@nomiclabs/hardhat-waffle");
require('dotenv').config({ path: 'variables.env' });

// This is a sample Hardhat task. To learn how to create your own go to
// https://hardhat.org/guides/create-task.html
task("accounts", "Prints the list of accounts", async () => {
  const accounts = await ethers.getSigners();

  for (const account of accounts) {
    console.log(account.address);
  }
});

// You need to export an object to set up your config
// Go to https://hardhat.org/config/ to learn more

/**
 * @type import('hardhat/config').HardhatUserConfig
 */
 module.exports = {
  paths: {
    artifacts: './src/artifacts',
  },

  networks: {
    hardhat: {
      chainId: 1337
    },
  },
  solidity: "0.8.4"
};
🧠 Never forget any of your passwords with Roboform
-
The module.exports contains most of the information for hardhat to check.
-
artifacts is where your ABI information will be when we compile and deploy the solidity code.
-
networks has information that hardhat needs to know such as which network you are deploying your code to: ethereum mainnet, testnets, or local network. For now, you are just going to be using your local network.
-
chainId needs to be set to 1337 to configure correctly with Metamask.
-
Change the file name of scripts/sample-script.js to scripts/deploy.js.
📝 Code The Smart Contract
It is time to program the smart contract that you will deploy to the blockchain and interact with using your React front end.
Remix IDE: Remix is an in-browser solidity development environment. It is a good way to write smart contracts and test them before deploying them into your projects. Your project is set up, so you will use Remix to test your smart contract.
-
On the left side under Contracts, you will see example contracts. Create a new contract by clicking the new contract icon.
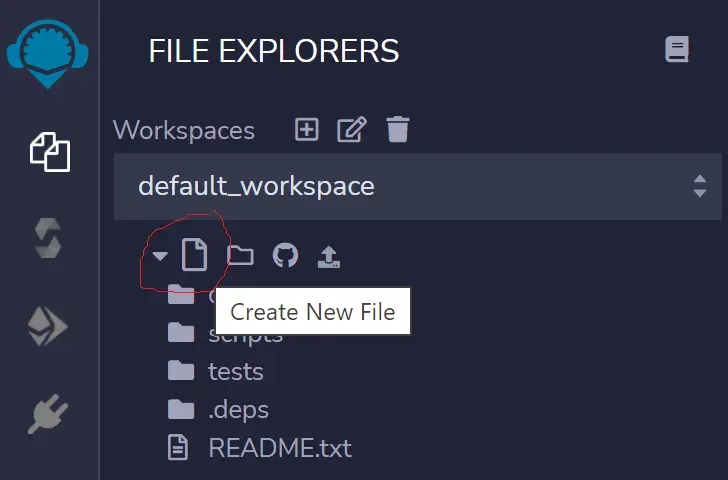
-
Create a new contract called FCTToken:
pragma solidity ^0.8.0;

import "https://github.com/OpenZeppelin/openzeppelin-contracts/blob/master/contracts/token/ERC20/ERC20.sol";

contract FCTToken is ERC20 {

    constructor(string memory name, string memory symbol) ERC20(name, symbol) {
        _mint(msg.sender, 10000 * (10 ** 18));
    }

    function faucet (address recipient , uint amount) external {
      _mint(recipient, amount);
    }
}
This is the code for your smart contact. You are importing the Open Zeppelin library into your Remix IDE. When you create your contract with contract FCTToken is ERC20 your contract will have all the functions from the open zeppelin ERC20 token.
These functions are:
function name() public view returns (string)
function symbol() public view returns (string)
function decimals() public view returns (uint8)
function totalSupply() public view returns (uint256)
function balanceOf(address _owner) public view returns (uint256 balance)
function transfer(address _to, uint256 _value) public returns (bool success)
function transferFrom(address _from, address _to, uint256 _value) public returns (bool success)
function approve(address _spender, uint256 _value) public returns (bool success)
function allowance(address _owner, address _spender) public view returns (uint256 remaining)
💡 From marketing to design use Fiverr for all your needs
The constructor part of the code will initialize the smart contract parameters name and symbol with values that you will pass to it when it is deployed. These will be the name of your token and its symbol: “Faucet”, “FCT”.
_mint is an inherited function so you can mint 10,000 tokens. The math used when you call _mint has to be implemented because of token base units.
You added your new function to this smart contract faucet which takes two arguments address recipient and uint amount.
-
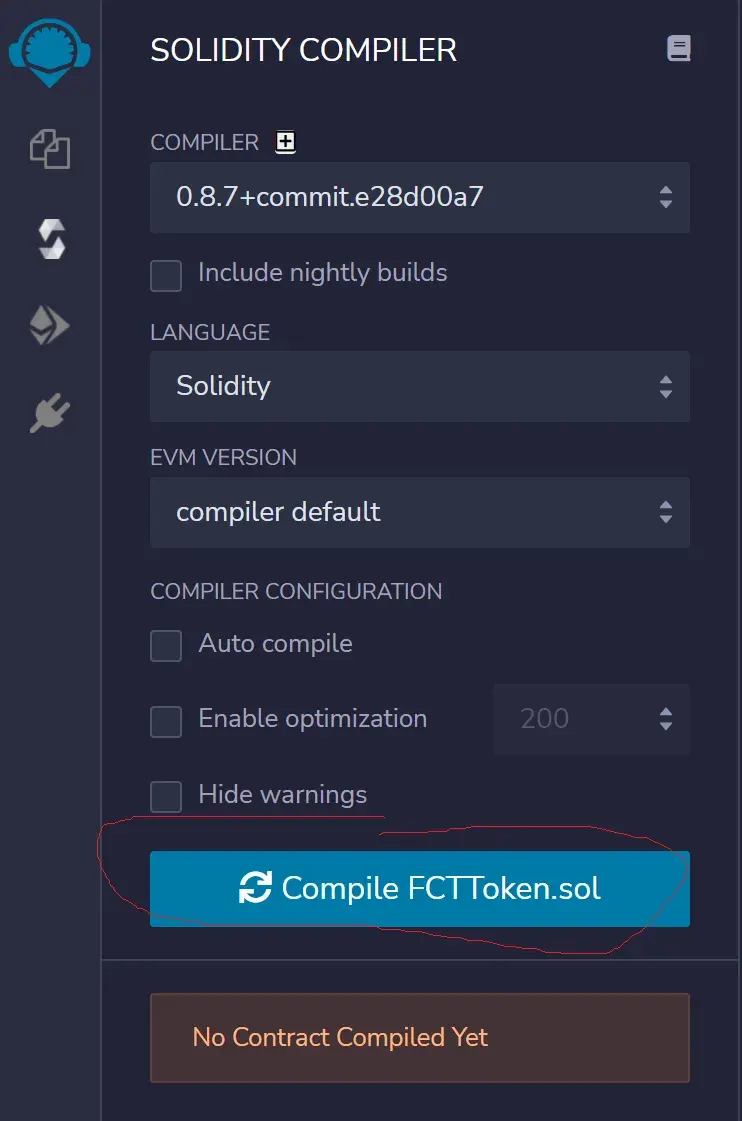
Compile your code to test it out. Click the solidity icon on the left panel.
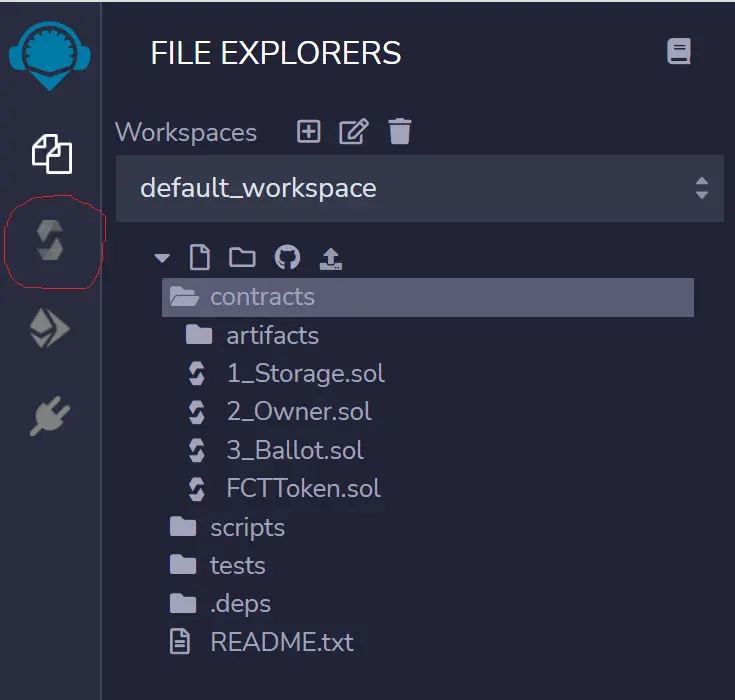
-
Click the compile button on the left panel.
-
You will see the Remix console run the compiler.
-
Click the ethereum icon on the left panel to deploy your code in the Remix environment.
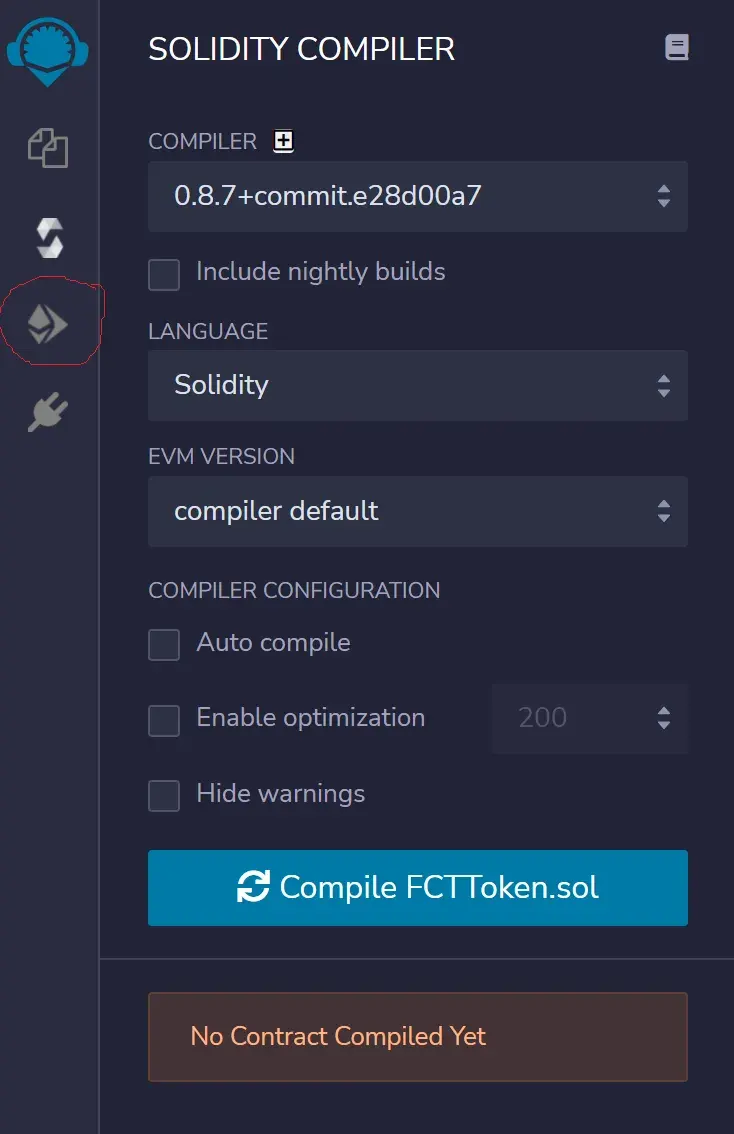
You can see your contract waiting to be deployed. Click Deploy.
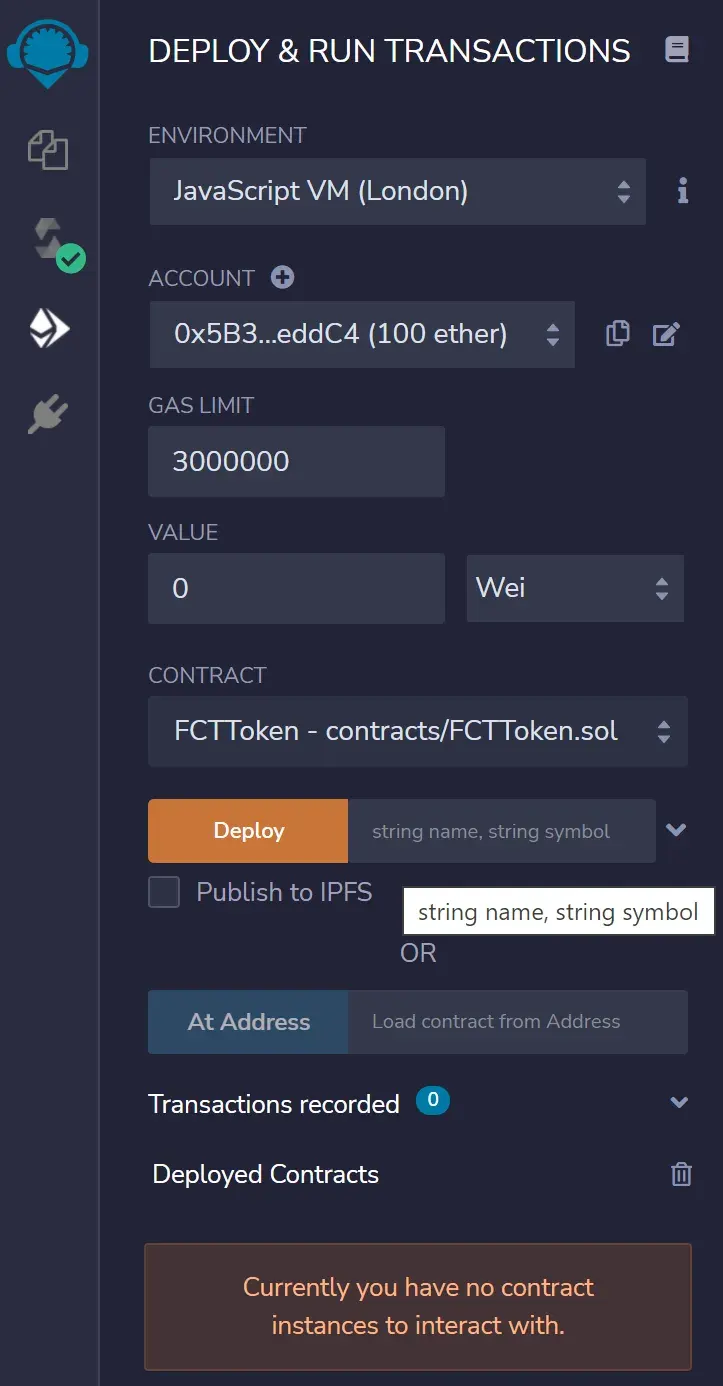
If everything is working, you will see a green check mark in the Remix console.

You should see your smart contract under Deployed Contracts. Click the arrow icon to expand it.
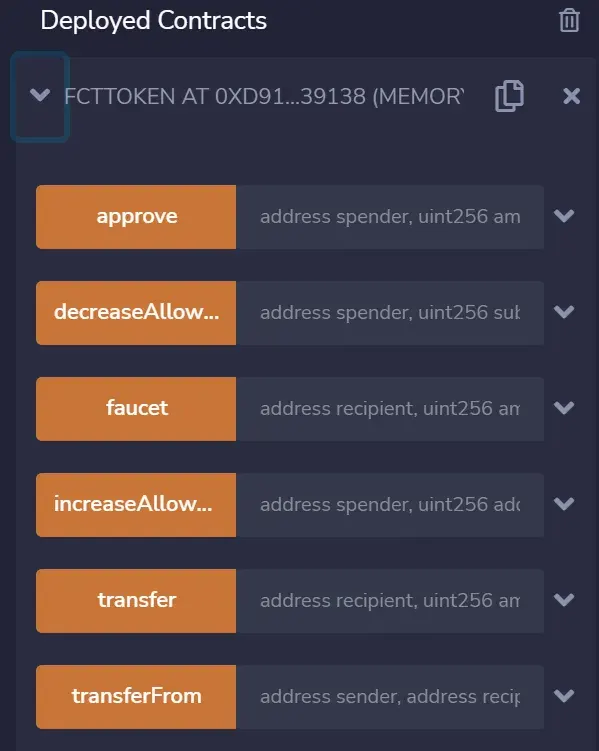
You will now see a list of all the available functions you can use in your smart contract. This includes all the functions you received from the Open Zeppelin contracts import.

Open up the faucet function.
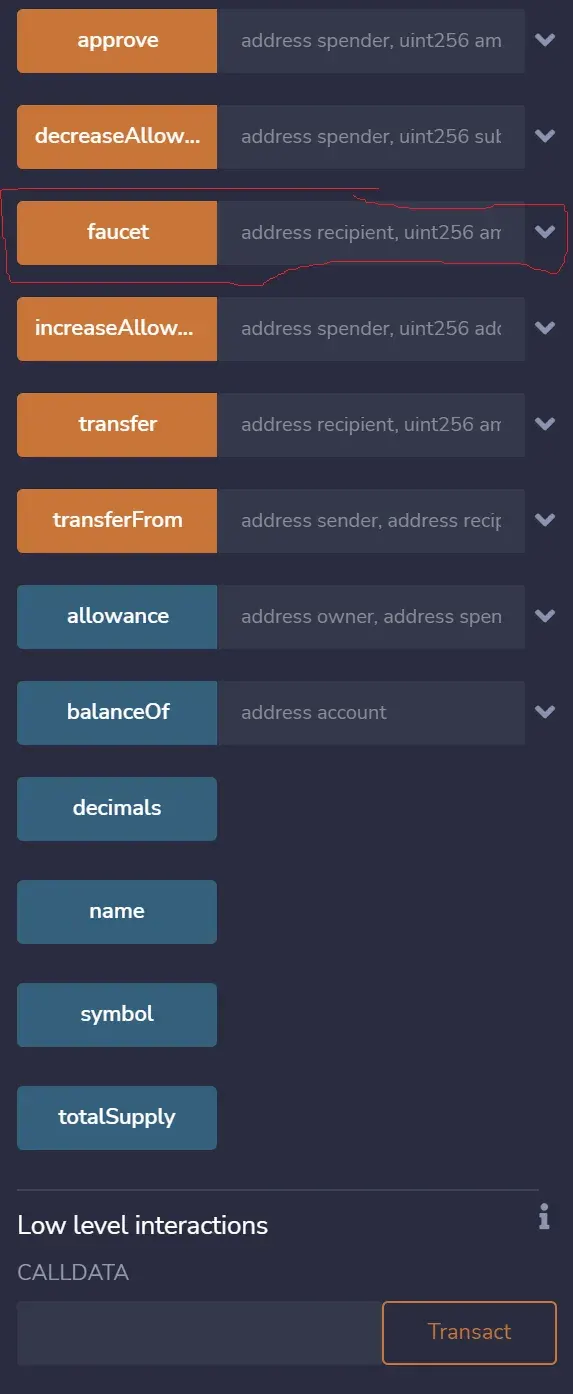
You will see the inputs for each argument: recipient and amount.
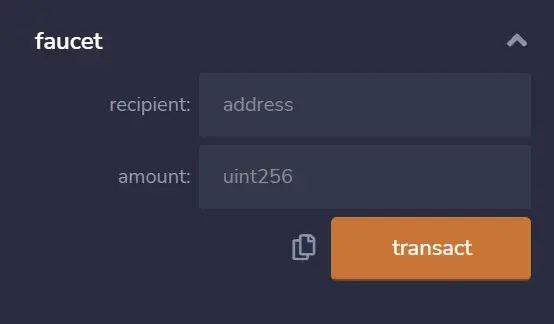
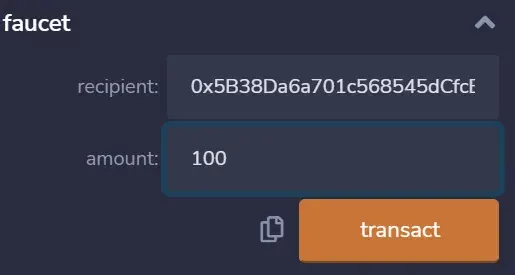
You will see a drop down menu under Account. This allows you to switch simulated user accounts. Each account is loaded up with test ether. Copy the address of the current account by clicking the copy icon.
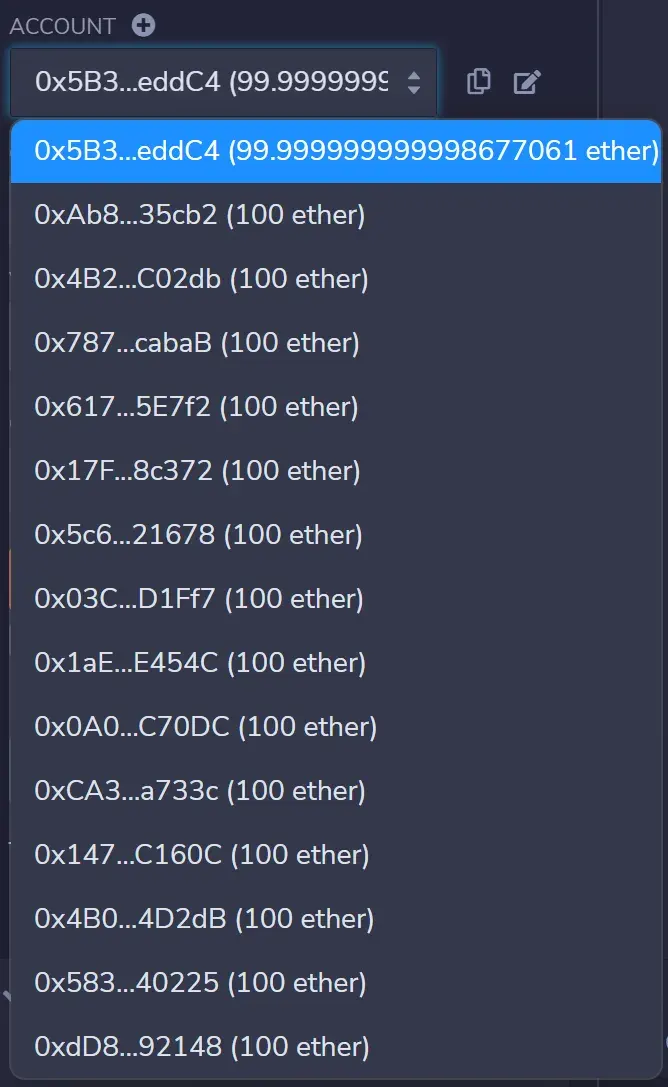
Paste that address into the faucet box for recipient and 100 for amount then click transact.
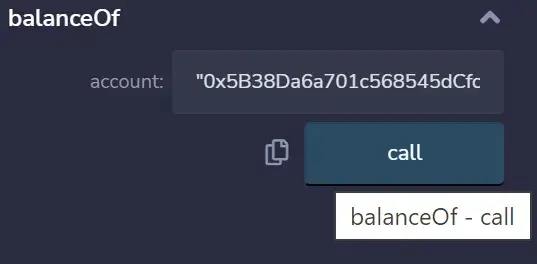
You deployed a smart contract function. To check to see if it worked, open your smart contract functions and call balanceOf with your address as the argument. You should see a balance of 100.

There is a difference between the functions with orange buttons and the functions with blue buttons. The orange functions write data to the blockchain, this counts as a transaction which costs gas. This action is immutable. The blue functions read data which counts as a call, this is free and does not change any data on the blockchain.
Your smart contract is working, you can safely use it in your project.
In your project in the /contracts folder delete any contracts and create a new contract called FCTToken.sol with the code you just tested:
pragma solidity ^0.8.3;

import "@openzeppelin/contracts/token/ERC20/ERC20.sol";

contract FCTToken is ERC20 {

    constructor(string memory name, string memory symbol) ERC20(name, symbol) {
        _mint(msg.sender, 100000 * (10 ** 18));
    }

    function faucet (address recipient , uint amount) external {
      _mint(recipient, amount);
    }
}
💰 Sign up and get $10 of bitcoin free from Coinbase.
📈 Deploy A Smart Contract On Your Local Blockchain
In your terminal and inside your project’s root directory run:
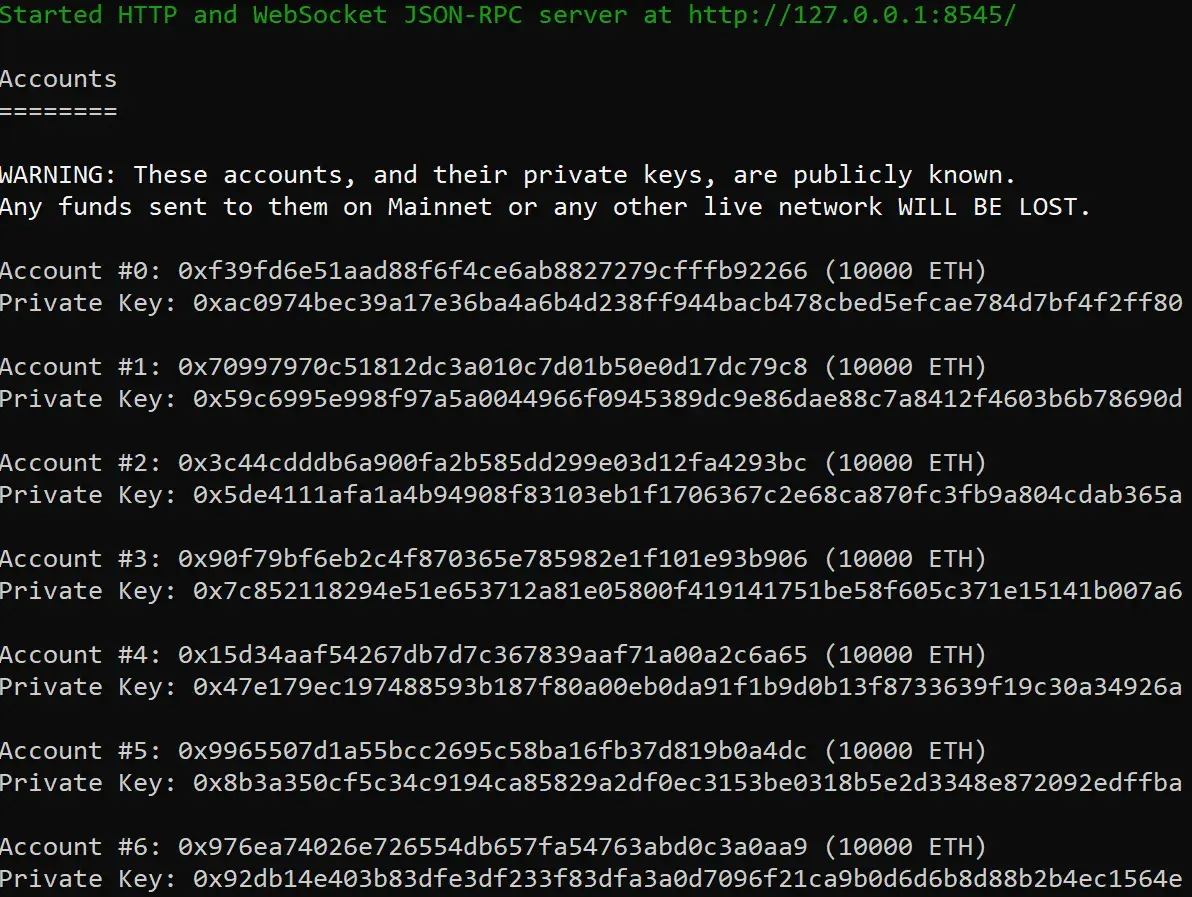
npx hardhat node
You will see hardhart start running a local blockchain. It will give you a list of addresses with test eth. Leave this terminal window running and open a new one.
Open your scripts/deploy.js and update it to:
const hre = require("hardhat");

async function main() {
  const [deployer] = await hre.ethers.getSigners();

  console.log(
    "Deploying contracts with the account:",
    deployer.address
  );

  const FCTToken = await hre.ethers.getContractFactory("FCTToken");
  const fctToken = await FCTToken.deploy("FCTToken", "TKN");

  await fctToken.deployed();

  console.log("Token deployed to:", fctToken.address);
}

main()
  .then(() => process.exit(0))
  .catch(error => {
    console.error(error);
    process.exit(1);
  });
Compile and deploy the FCTtoken.sol:
npx hardhat compile
Then run this command:
npx hardhat run scripts/deploy.js --network localhost
Terminal should print out something similar to:

Save the address of Token Deployed To* you will be using it later.
You have deployed your FCTtoken.sol contract to your local hardhat blockchain.
💳 Here is $10 off your first purchase with Afterpay. Shop now and pay later in 4 interest-free payments.
📍 Design The Front End
You will build a web page with a few buttons. These buttons will call your smart contract functions. You need:
- faucet button: to send FCT to a user’s wallet
- check balance: display a message with current user’s balance
- send FCT: user can send FCT to another address
- amount input: an input for the amount to send
- address input: an input for the address of the payee
In your /src/app.css file delete all the code and replace it with:
.App {
  text-align: center;
  background-color: #34a3a3;
  height: 100%;
  height: 100vh;
  display: flex;
  align-items: center;
  justify-content: center;
}

.App-header {
  background-color: rgb(253, 204, 251);
  padding: 20px;
  color: white;
}

.App-intro {
  font-size: large;
}
In your App.js file delete all the code and replace it with:
import './App.css';
import FCTToken from './artifacts/contracts/FCTToken.sol/FCTToken.json'

function App() {

  const Token = FCTToken;

  return (
    <div className="App">
    </div>
  );
}

export default App;
In your terminal run this code to start your localhost:
npm run start
This code will load up at localhost:3000 and show a blank page with a blue colored page.

- Update the App.js once more:
import './App.css';
import FCTToken from './artifacts/contracts/FCTToken.sol/FCTToken.json'
import 'bootstrap/dist/css/bootstrap.min.css'
import { Container, Row, Col } from 'react-bootstrap'

function App() {

  const Token = FCTToken;

  return (
    <div className="App">
    <Container>
    <Row className="justify-content-md-center">
      <Col>
      <div>Faucet</div>
      </Col>
      <Col>
      <div>Send Area</div>
      </Col>
    </Row>
    </Container>
    </div>
  );
}

export default App;
You imported some bootstrap-react components and sketched out where you need the main UI components to be on the page.
You should see the page reload every time you save a change to your react code.
Create your Faucet component by adding this snippet at line 22:
<Faucet tokenContract={Token}/>
This creates a react component and sends it the prop Token. This variable contains the ABI which you are importing at line 5.
Code the Faucet component by creating a folder and file src/components/Faucet.js. The code for your Faucet.js react component:
import { useState } from 'react';
import { ethers } from 'ethers'
import Card from 'react-bootstrap/Card'
import Button from 'react-bootstrap/Button'
const tokenAddress = "{YOUR DEPLOYED TOKEN ADDRESS}"
const Faucet = (props) => {
const [balance, setBalance] = useState()
const [showBalance, setShowBalance] = useState(false)
async function getBalance() {
if (typeof window.ethereum !== 'undefined') {
const [account] = await window.ethereum.request({ method: 'eth_requestAccounts' })
const provider = new ethers.providers.Web3Provider(window.ethereum);
const contract = new ethers.Contract(tokenAddress, props.tokenContract.abi, provider)
const balance = await contract.balanceOf(account);
console.log("Balance: ", balance.toString());
setBalance(balance.toString());
setShowBalance(true);
}
}
async function faucet() {
if (typeof window.ethereum !== 'undefined') {
const account = await window.ethereum.request({ method: 'eth_requestAccounts' });
const provider = new ethers.providers.Web3Provider(window.ethereum);
const signer = provider.getSigner();
const contract = new ethers.Contract(tokenAddress, props.tokenContract.abi, signer);
contract.faucet(account[0], 100);
}
}
return (
<div>
<Card style={{background: "rgba(227, 104, 222, 0.71)"}}>
<Card.Body>
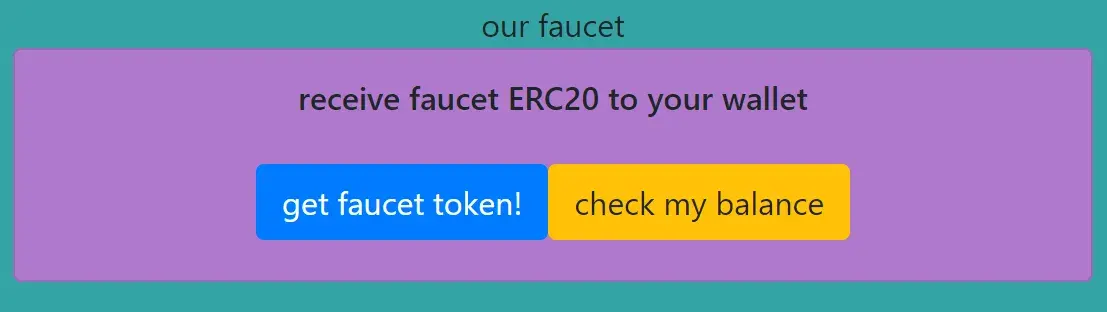
<Card.Subtitle>receive faucet ERC20 to your wallet
</Card.Subtitle><br></br>
<div className="d-grid gap-2">
<Button onClick={faucet}>get faucet token</Button>
<Button onClick={getBalance} variant="warning">check my balance</Button>
</div>
</Card.Body>
</Card>
</div>
)
}
export default Faucet
On line 7, replace the tokenAddress value with the Token Deployed To address you got from your contract being deployed.
You have declared two async functions getBalance() and faucet(). These need to be asynchronous functions as you are calling the smart contract which lives in the block chain so you need JavaScript to work well with ethereum.
In the function you check to see if the user has MetaMask running, then get the data needed using the ethers.js library and assign that data to local variables. This data is made accessible via the ABI, which you imported into App.js and passed as a property to Faucet.js.
Now you need to import that component in to your App.js at the top of the file:
import Faucet from './components/Faucet.js'
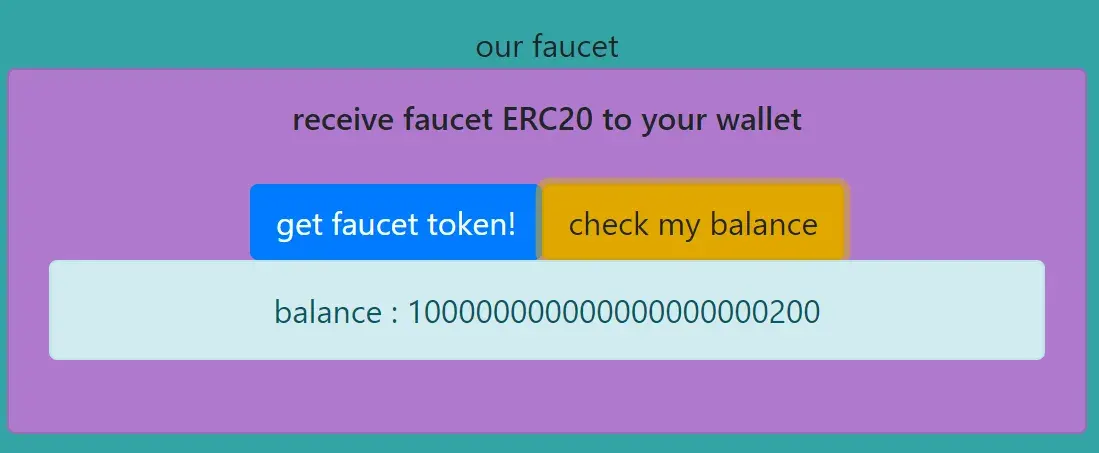
Back on your localhost:3000 you should see something like this:
The blue background around your Faucet component is because it is wrapped in a react-bootstrap component and was customized inline with CSS styling. The different color buttons are set using the variant property.
💹 Join Robinhood with my link and we will both pick a free stock.
📍 Test The Faucet
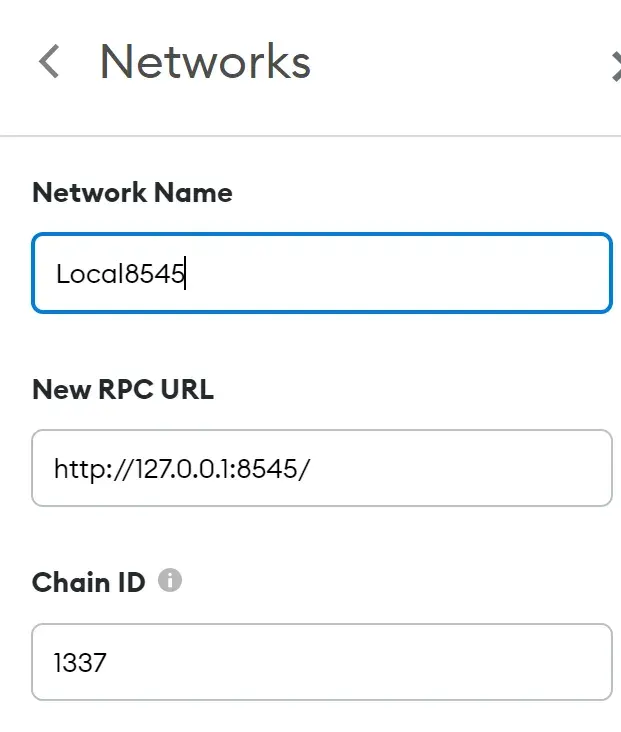
Set up your MetaMask wallet so that it connects to your hardhat blockchain node. You get a list of addresses and private keys for testing. Your node should still be running:
-
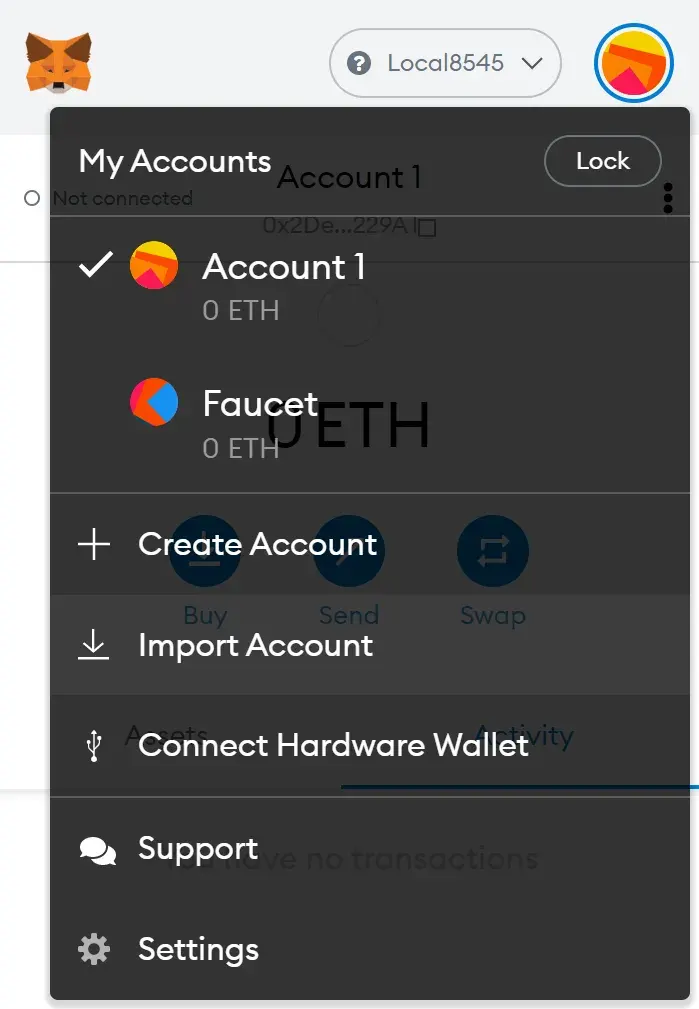
You can use any of these accounts to connect your Metamask to your local blockchain instance. Use the first one to stay clear.
-
Copy the private key of the first account in the list.
-
Open MetaMask and select the available networks dropdown. Under Settings > Networks > Add A Network, connect to localhost:8545 as this is the port of your local blockchain:
-
Go to Import Account:
-
Paste in the private key of the first account from your terminal. Once the account is connected, your account will be loaded up with fake test eth.
-
In your UI click get balance and open your browser developer console. You should see this in your console log:

-
This is the wallet balance of your FCT token. You minted the contract and in the smart contract, the minter receives the whole supply of tokens.
-
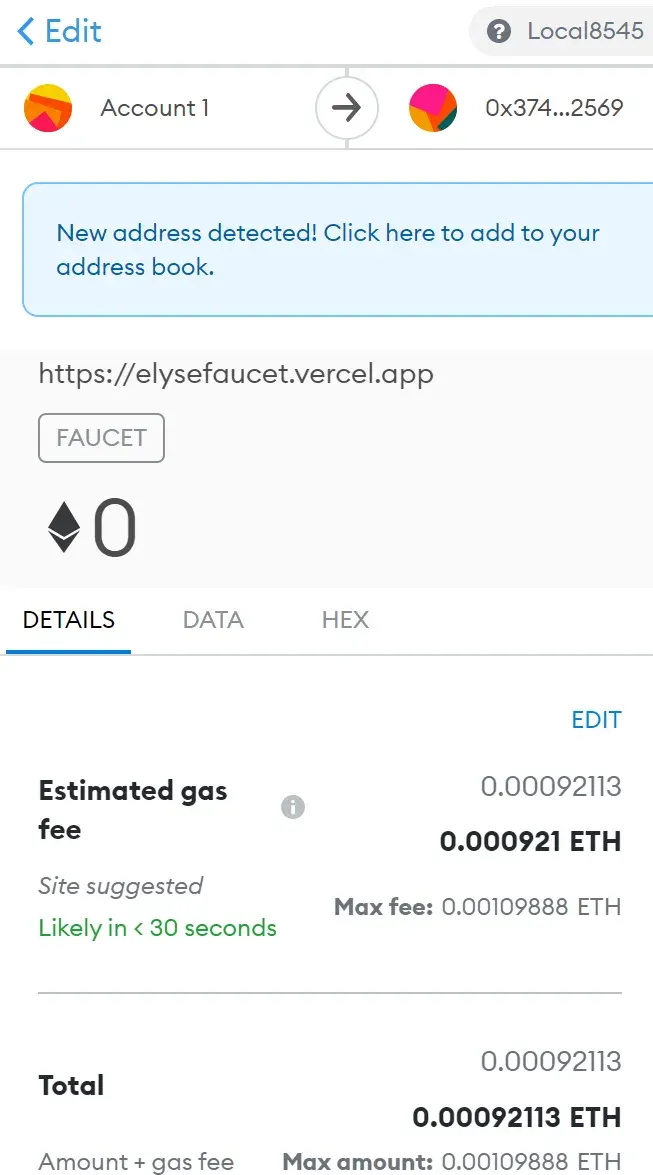
In your UI, click get faucet token.
-
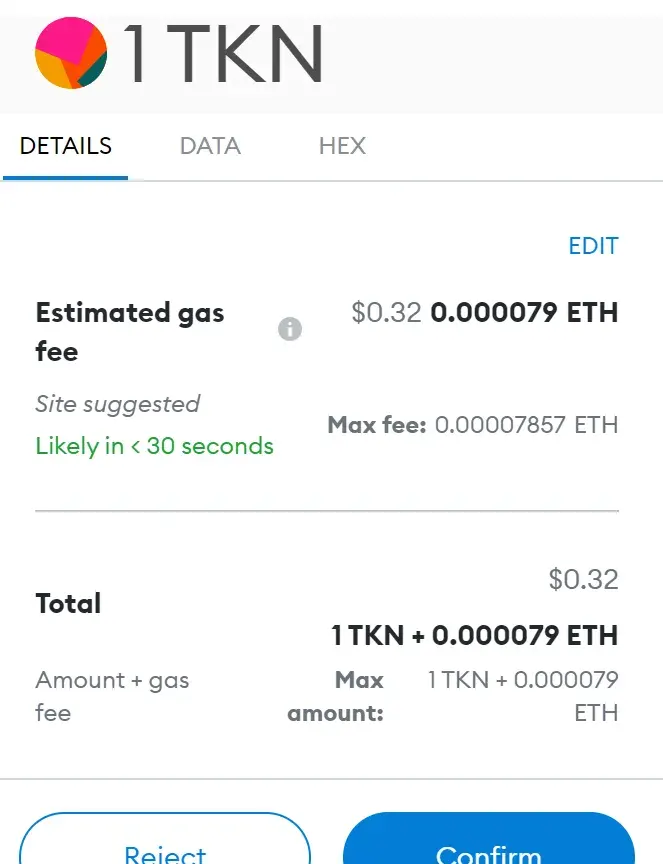
MetaMask will ask you to connect to the site. You will be shown this transaction to confirm in your MetaMask wallet:
-
This shows the gas fee to run the transaction. You are using test eth, but on the mainnet, this would cost real eth.
-
Click confirm and click get balance. You should see the updated balance:

-
You can see your balance has updated by 100 Wei. Getting the balance of the user address is a read only call, which does not count as a transaction and requires no gas to run.
-
Take that console.log message and add it to your UI.
-
Create a new file components/Message.js:
import Alert from 'react-bootstrap/Alert'

const Message = ({ balance }) => {
    return (
      <div>
      <Alert variant="info"> balance : {balance}</Alert>
      </div>
  )
}

export default Message
- You are importing the Alert component from bootstrap and passing in the balance property.
- In the Faucet.js file add the following code at line 45, under get Balance button:
{ showBalance ? <Message balance={balance}/> : null }
- Import the component into the Faucet.js file at the top of the file:
import Message from './Message'
-
Now if you click get balance in your UI, you will see the message component render to your page.
-
Create your send token component. In the App.js file, add the new component where the text Send Area is:
<TokenSend tokenContract={Token}/>
- This passes the TokenABI as a property to the TokenSend component.
- Create a new file components/TokenSend.js:
import { useState } from 'react';
import { ethers } from 'ethers'
import Card from 'react-bootstrap/Card'
import Button from 'react-bootstrap/Button'

const tokenAddress = "{YOUR DEPLOYED TOKEN ADDRESS}"

const TokenSend = (props) => {

  const [userAccount, setUserAccount] = useState()
  const [amount, setAmount] = useState()

  // request access to the user's MetaMask account
  async function requestAccount() {
    await window.ethereum.request({ method: 'eth_requestAccounts' });
  }

  async function sendCoins() {
  if (typeof window.ethereum !== 'undefined') {
    await requestAccount()
    const provider = new ethers.providers.Web3Provider(window.ethereum);
    const signer = provider.getSigner();
    const contract = new ethers.Contract(tokenAddress, props.tokenContract.abi, signer);
    const transation = await contract.transfer(userAccount, amount);
    await transation.wait();
    console.log(`${amount} Coins successfully sent to ${userAccount}`);
  }
}
    return (
        <Card style={{background: "rgba(227, 104, 222, 0.71)"}}>
        <Card.Body>
        <Card.Subtitle> send faucet to an address
        </Card.Subtitle>
        <br></br>
        <div className="d-grid gap-2">
        <input onChange={e => setUserAccount(e.target.value)} placeholder="Payee 0x address" />
        <input onChange={e => setAmount(e.target.value)} placeholder="Amount" />
        <Button onClick={sendCoins} variant="success">send </Button>
        </div>
        </Card.Body>
        </Card>
    )
}

export default TokenSend
- Update the variable tokenAddress with your deployed contract address.
- In the App.js file import the TokenSend.js component:
import TokenSend from './components/TokenSend.js'
-
You will now be able to send tokens to different wallets.
-
In amount enter 1000000000000000000 (equal to one whole token in wei), then add an address from one of the addresses in the terminal.
-
Click send and confirm the transaction in MetaMask in your browser terminal you should see the console.log:

-
You simulated multiple users by importing different accounts into your MetaMask and switching between them to test the functionality.
-
This is now a working Decentralized Application (dApp). The front end is running on localhost:3000 and the local hardhat blockchain on localhost:8545.
-
Next you are going to test it on the real testnet network.
💰 Sign up and get $10 of bitcoin free from Coinbase.
💲 Launch On the Goreli Testnet
-
You will use the Goreli testnet to deploy your smart contract.
-
You will need to load up your wallet with test eth for the Goreli network or Goeth.
-
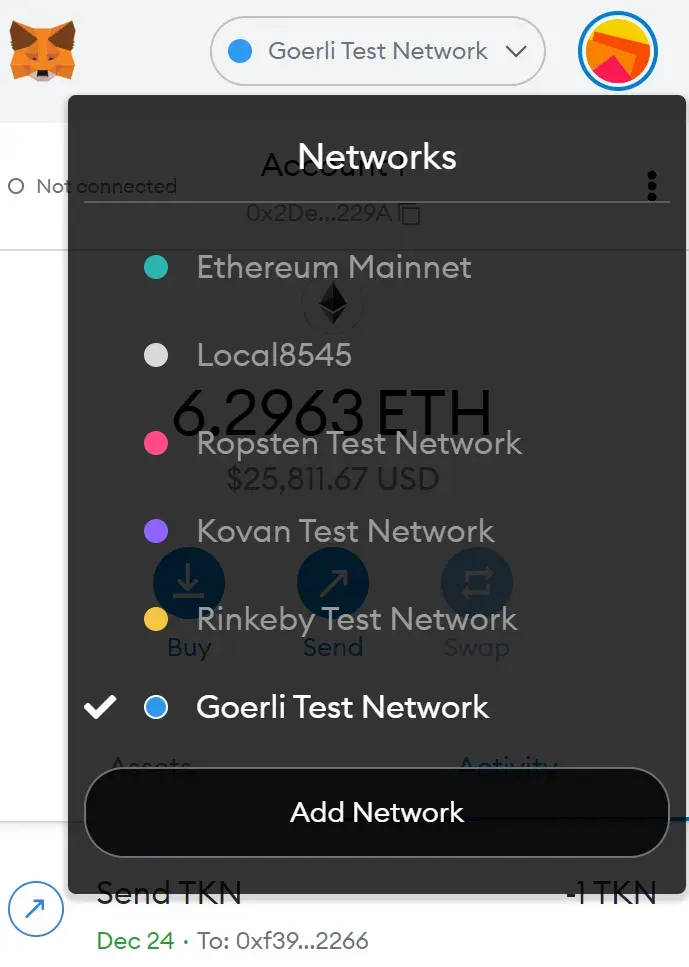
Connect your MetaMask wallet to the Goreli testnet using the drop down menu.
-
Get some test ether from:
-
To connect to the Goreli testnet network, you need an API from Infura.io.
-
Set up a free account and sign in to Infura. Go into dashboard and click the ethereum icon in the left panel.
-
Click the create new project button in the top right of the page:

-
Name your project.
-
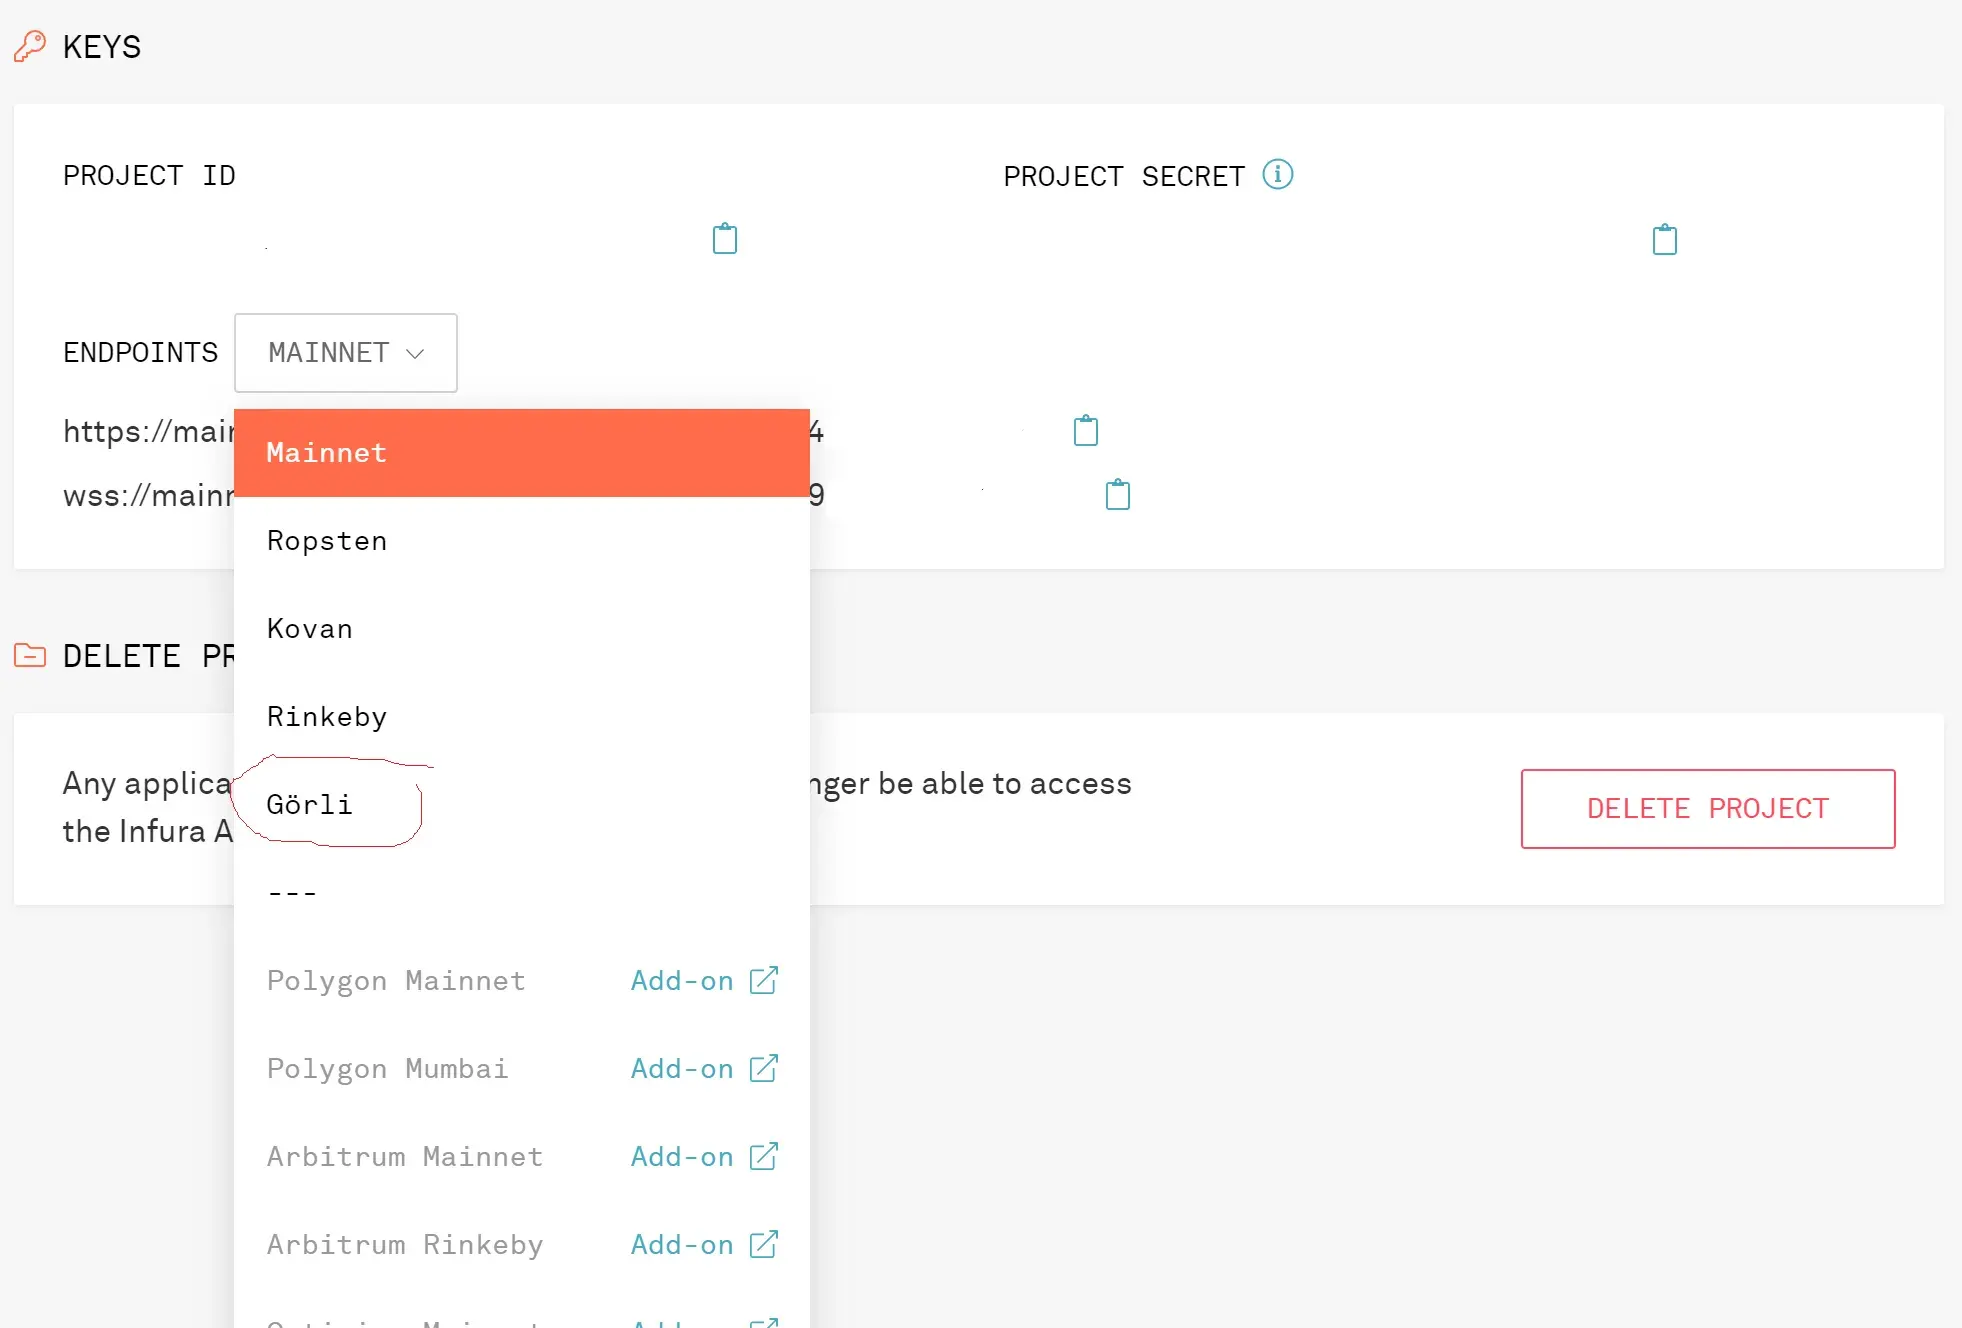
In your project settings set the endpoints dropdown box to Goreli.
-
Get the ProjectID and end point URL, you will use it later.
-
Open your hardhat.config.js file and update it to:
require("@nomiclabs/hardhat-waffle");
require('dotenv').config({ path: 'variables.env' })

// This is a sample Hardhat task. To learn how to create your own go to
// https://hardhat.org/guides/create-task.html
task("accounts", "Prints the list of accounts", async () => {
  const accounts = await ethers.getSigners();

  for (const account of accounts) {
    console.log(account.address);
  }
});

// You need to export an object to set up your config
// Go to https://hardhat.org/config/ to learn more

/**
 * @type import('hardhat/config').HardhatUserConfig
 */
 module.exports = {
  paths: {
    artifacts: './src/artifacts',
  },
  networks: {
    hardhat: {
      chainId: 1337
    },
    goreli: {
      url: "{YOUR END POINT URL}",
      accounts: [`0x${process.env.PRIVATE_KEY}`]

    }
  },
  solidity: "0.8.3"
};
- Update the gorlei.url property with the endpoint URL from Infura.
- In goreli.accounts, the variable PRIVATE_KEY is stored in your variables.env file. This file will not be pushed to GitHub as it is in your .gitignore file. Never expose your private key in your config file, if you do anyone can access your wallet and steal your funds. By referencing the secret variable in your config file, your private keys are safe.
- In your variables.env file update your PRIVATE_KEY:
PRIVATE_KEY="{YOUR-PRIVATE-KEY}"
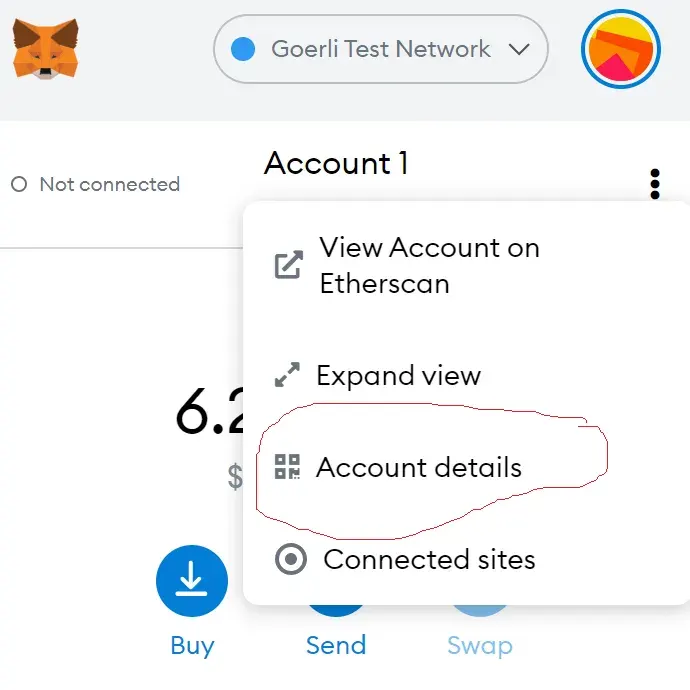
- To get the PRIVATE_KEY:
- open your MetaMask wallet
- change your account to the Goreli network
- click the three button icon
- go to Account Details
- click Export Private Key
🕋 Deploy Your dApp
- In your terminal run:
npx hardhat run scripts/deploy.js --network goreli
Once your contract is deployed you will see this:

-
You can take that Token deployed to: address and search for it on Goreli etherscan to see the contract live on the test blockchain. Etherscan is used to verify transactions on the blockchain.
-
Update Faucet.js and TokenSend.js with your deployed token address:
const tokenAddress = "{YOUR-DEPLOYED-TOKEN-ADDRESS}"
- Your UI should now work and when you click get faucet token or send, you call a function to your smart contract on the Goreli testnet.
- You may have to wait a while for the transaction to be mined on Goreli, but you can check the status of your transaction on the Goreli etherscan.
🔼 Upload To A Hosting Service
- By uploading your dApp to a hosting service, you can share the link with others.
- Free web hosting Here are a few services you can use to host your dApp.
- Make a new repository on GitHub and push your project to the master branch. Your .gitignore file is configured so that it will only push your source code to Github.
- Go to your hosting service, create a new account or log in and follow their directions to create a new web site.
💶 Earn Bitcoin by viewing ads at CoinPayU
🔶 Summary
You learned how to build a simple single page application that allows a user to receive 100 faucet token (FCT) that you created.
Here is the fully built dApp.
💓 If you enjoyed the information and the web site, please donate.
 Elyse Y. Robinson, an enterprising entrepreneur, is the mastermind behind Taxes and Services, a multifaceted holding company that doubles as her accounting firm. Her ventures encompass an array of innovative projects. One of her key initiatives is Switch Into Tech, a dynamic weekly newsletter that doubles as a platform for advertising monthly career seminars, offering weekly tech-related freebies, and promoting her latest podcast episodes of Nobody Wants To Work Tho. Additionally, Elyse shares her insights through her blog at Data.gal, where she delves into various data-related topics. Elyse’s passions extend beyond her businesses; she is deeply enamored with Mexico, has an insatiable appetite for research, and is dedicated to assisting others in transitioning into technology careers.